2025 Complete Guide: Qwen-Image-Layered - Revolutionary AI Image Layer Decomposition Technology
🎯 Key Takeaways (TL;DR)
- Revolutionary Technology: Qwen-Image-Layered can automatically decompose any image into multiple editable RGBA layers, eliminating the need for manual Photoshop work
- Inherent Editability: Each layer can be independently manipulated (resize, recolor, replace, move) without affecting other content, ensuring high-fidelity editing
- Flexible Decomposition: Supports variable layer counts (3-8+ layers) and recursive decomposition for infinite refinement
- Open Source & Accessible: Licensed under Apache 2.0, available on HuggingFace and ModelScope with easy Python integration
- Adobe Alternative: Community excitement centers on replacing expensive Photoshop subscriptions with free, AI-powered layer editing
Table of Contents
- What is Qwen-Image-Layered?
- How Does Layer Decomposition Work?
- Key Features and Capabilities
- Practical Applications
- Technical Implementation Guide
- Comparison with Traditional Methods
- Community Response and Use Cases
- Frequently Asked Questions
- Conclusion and Next Steps
What is Qwen-Image-Layered?
Qwen-Image-Layered is a groundbreaking AI model developed by the Qwen team that automatically decomposes static images into multiple RGBA (Red, Green, Blue, Alpha) layers. Unlike traditional segmentation tools that simply identify objects, this model generates complete layers with transparency channels and intelligently fills in occluded regions.
Core Innovation
The model transforms flat images into structured, editable multi-layer compositions similar to professional Photoshop projects - but completely automatically. This unlocks "inherent editability" where each semantic component exists on its own layer, ready for independent manipulation.
💡 Key Difference from SAM (Segment Anything Model)
While SAM only segments objects, Qwen-Image-Layered goes further by:
- Generating complete RGBA layers with alpha channels
- Filling in background regions hidden by foreground objects
- Creating editable layer stacks, not just masks
Technical Foundation
- Model Type: Diffusion-based layer decomposition
- Output Format: Multiple RGBA PNG images
- Architecture: Built on Qwen2.5-VL foundation
- License: Apache 2.0 (fully open source)
- Availability: HuggingFace, ModelScope, GitHub
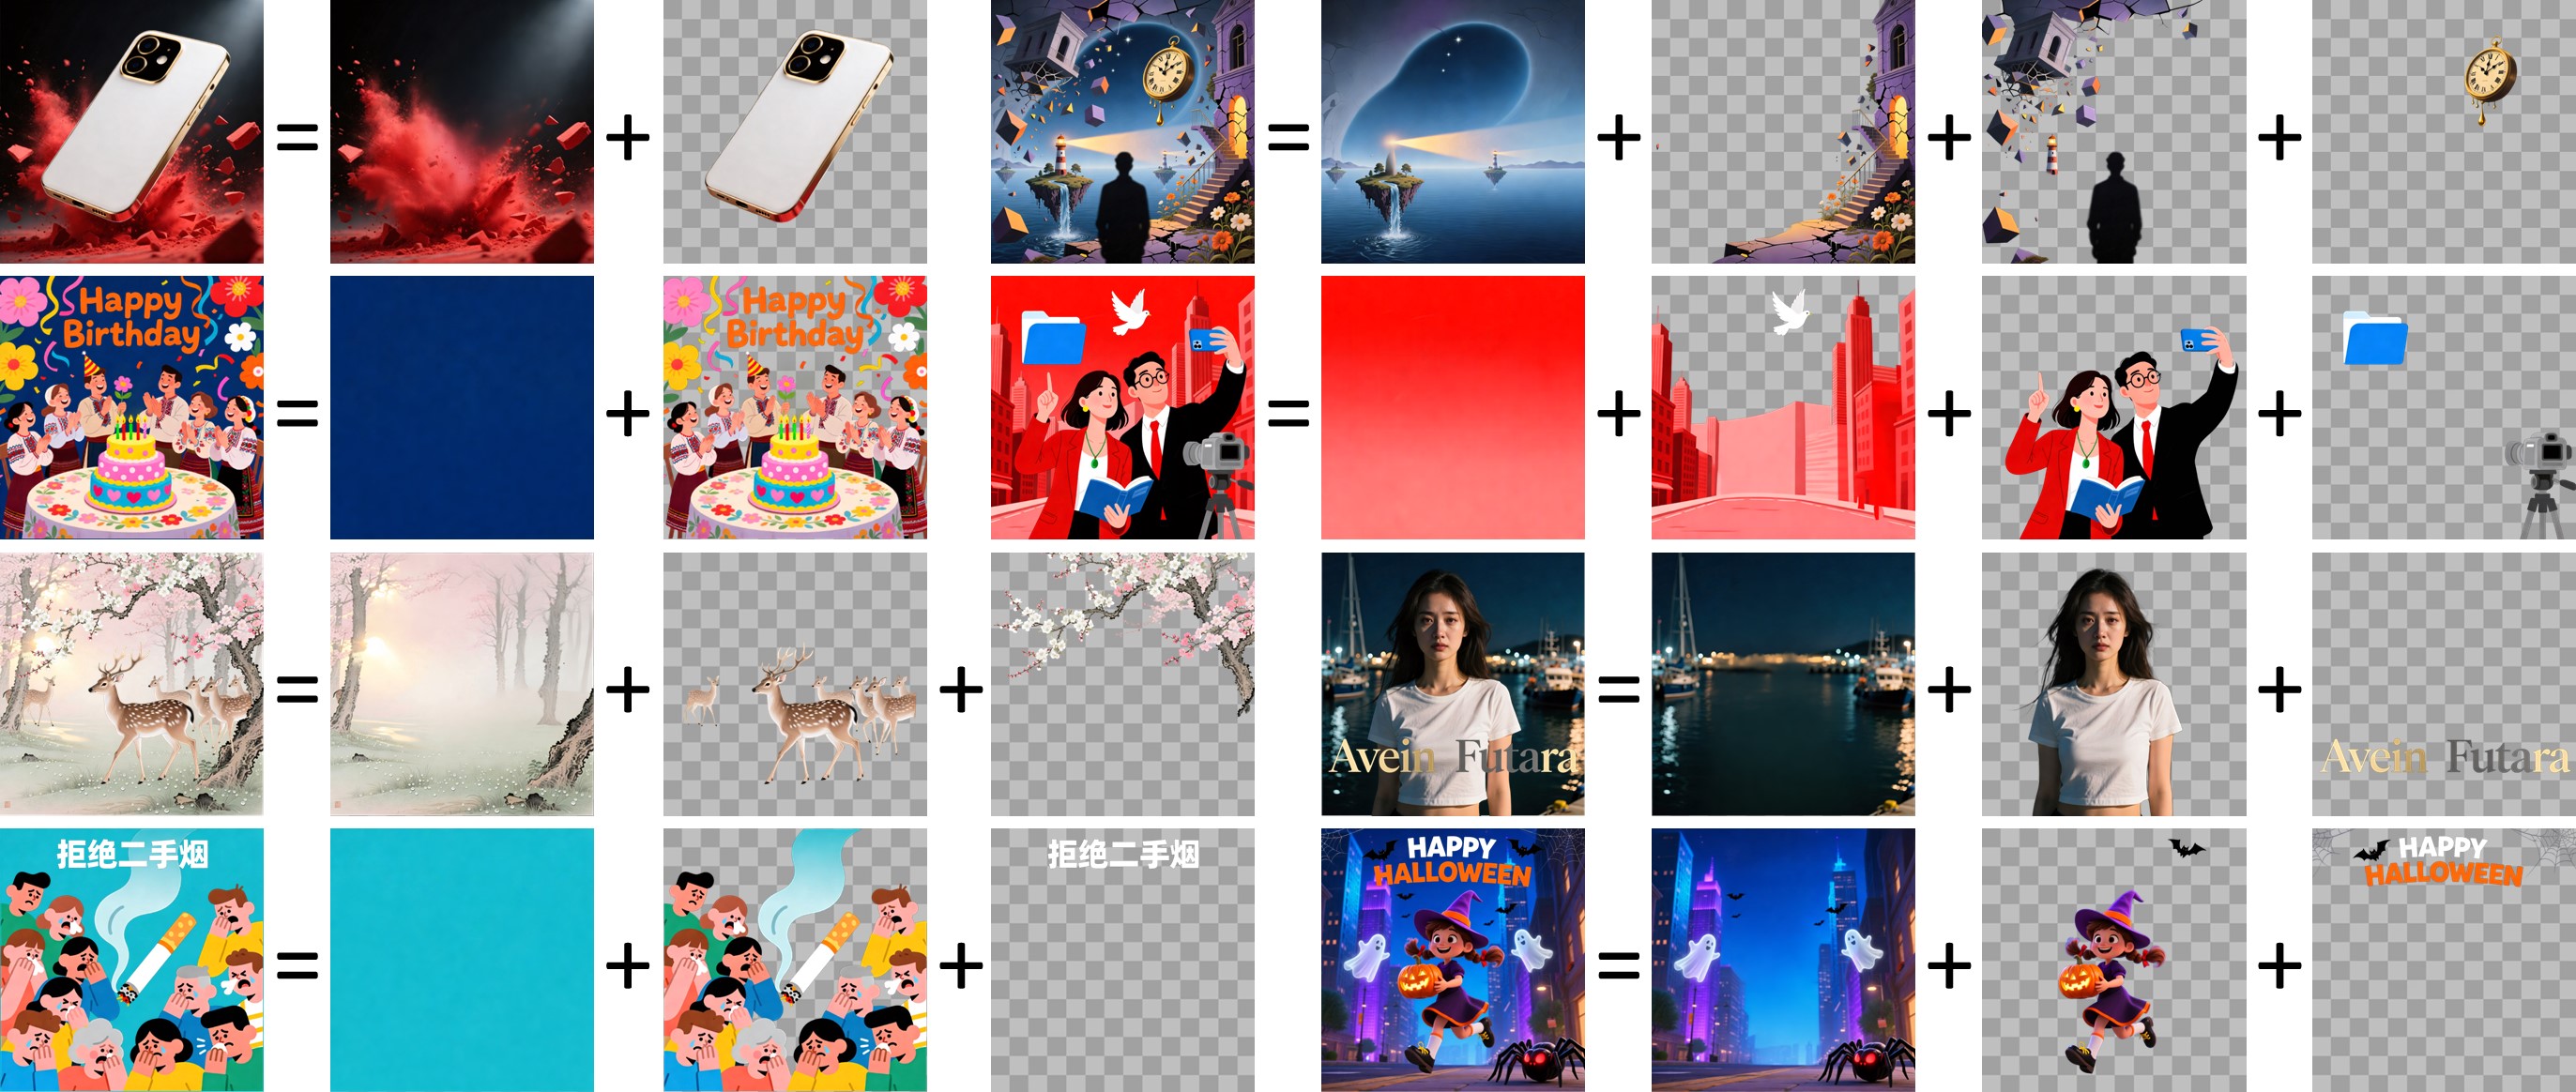
Figure 1: Qwen-Image-Layered decomposes images into editable RGBA layers
How Does Layer Decomposition Work?
The Decomposition Process
Step-by-Step Breakdown
- Image Analysis: The model analyzes the input image to identify distinct semantic components
- Intelligent Segmentation: Objects, backgrounds, and elements are separated based on depth and semantic meaning
- Occlusion Handling: Hidden regions behind foreground objects are intelligently reconstructed
- Alpha Channel Generation: Transparency masks are created for each layer
- Layer Stack Output: Complete RGBA images are generated for each layer
What Makes It Special?
| Feature | Traditional Segmentation | Qwen-Image-Layered |
|---|---|---|
| Output Type | Binary masks | Complete RGBA layers |
| Occlusion Handling | No | Yes (inpaints hidden areas) |
| Editability | Requires additional tools | Immediate layer editing |
| Background Reconstruction | Manual work needed | Automatic generation |
| Layer Count | Fixed | Variable (3-8+ layers) |
Key Features and Capabilities
1. Variable Layer Decomposition
Unlike fixed-layer systems, Qwen-Image-Layered supports flexible layer counts based on image complexity:
- Simple scenes: 3-4 layers (background, main subject, foreground)
- Complex scenes: 6-8+ layers (multiple objects, depth levels)
- User control: Specify desired layer count in parameters

Figure 2: Same image decomposed into 3 layers (left) vs 8 layers (right)
2. Recursive Decomposition
Any generated layer can be further decomposed into sub-layers, enabling:
- Infinite refinement levels
- Hierarchical editing workflows
- Fine-grained control over complex elements

Figure 3: Layer 2 recursively decomposed into additional sub-layers
3. Elementary Operations Support
The layered structure naturally enables high-fidelity basic operations:
✅ Object Removal
- Clean deletion without artifacts
- Automatic background filling
- No manual inpainting required
✅ Resizing Without Distortion
- Scale individual objects independently
- Maintain aspect ratios and quality
- No stretching or warping
✅ Free Repositioning
- Move objects anywhere on canvas
- Drag-and-drop layer manipulation
- Automatic depth ordering
✅ Recoloring
- Change colors of specific layers
- Preserve textures and details
- No color bleeding to other layers
4. Integration with Qwen-Image-Edit
Layers can be edited using Qwen-Image-Edit for advanced modifications:
- Text editing (change signage, labels)
- Object replacement (swap subjects)
- Style transfer on individual layers
- Content-aware modifications
Practical Applications
1. E-commerce Product Photography
Use Case: Create multiple product variations from a single photo
Workflow:
1. Decompose product photo into layers
2. Layer 1: Background → Replace with different scenes
3. Layer 2: Product → Recolor for different variants
4. Layer 3: Props → Add/remove accessories

Result: 10+ product images from 1 original photo
💰 Cost Savings: Eliminates need for multiple photoshoots
2. Graphic Design and Marketing
- Social Media Assets: Quickly create variations for A/B testing
- Banner Ads: Swap backgrounds while keeping brand elements
- Seasonal Campaigns: Update specific elements without full redesign
3. Game Development and Animation
Sprite Sheet Generation: Community member use case
"Making sprites with diffusion was frustrating because you always had to clip out background colors. With transparent layers, you can directly generate sprite sheets with proper alpha channels."
— u/ArtfulGenie69, Reddit
4. Comic and Manga Editing
Workflow Enhancement:
- Remove speech bubbles (isolated on separate layer)
- Translate text without affecting artwork
- Animate panels by separating characters from backgrounds
5. Professional Photo Editing
Replace expensive Photoshop subscriptions for:
- Portrait retouching (separate subject from background)
- Object removal and replacement
- Composite image creation
- Mask generation for further editing
Technical Implementation Guide
System Requirements
| Component | Minimum | Recommended |
|---|---|---|
| GPU VRAM | 8GB | 16GB+ |
| RAM | 16GB | 32GB |
| Python | 3.8+ | 3.10+ |
| CUDA | 11.7+ | 12.1+ |
⚠️ M1/M2 Mac Compatibility: Community members report successful runs on Mac Studio with 32GB RAM
Installation Steps
# Step 1: Install required packages
pip install transformers>=4.51.3
pip install git+https://github.com/huggingface/diffusers
pip install python-pptx torch pillow

# Step 2: Verify CUDA availability (for GPU users)
python -c "import torch; print(torch.cuda.is_available())"
Basic Usage Example
from diffusers import QwenImageLayeredPipeline
import torch
from PIL import Image

# Initialize pipeline
pipeline = QwenImageLayeredPipeline.from_pretrained(
    "Qwen/Qwen-Image-Layered"
)
pipeline = pipeline.to("cuda", torch.bfloat16)

# Load input image
image = Image.open("your_image.png").convert("RGBA")

# Configure decomposition parameters
inputs = {
    "image": image,
    "generator": torch.Generator(device='cuda').manual_seed(777),
    "true_cfg_scale": 4.0,
    "negative_prompt": " ",
    "num_inference_steps": 50,
    "num_images_per_prompt": 1,
    "layers": 4,  # Number of layers to generate
    "resolution": 640,  # Recommended: 640 or 1024
    "cfg_normalize": True,
    "use_en_prompt": True,
}

# Generate layers
with torch.inference_mode():
    output = pipeline(**inputs)
    output_images = output.images[0]

# Save individual layers
for i, layer in enumerate(output_images):
    layer.save(f"layer_{i}.png")
Parameter Optimization Guide
| Parameter | Default | Purpose | Tuning Tips |
|---|---|---|---|
layers | 4 | Number of output layers | 3-4 for simple, 6-8 for complex |
resolution | 640 | Processing resolution | 640 recommended, 1024 for high-res |
true_cfg_scale | 4.0 | Guidance strength | Higher = more defined layers |
num_inference_steps | 50 | Denoising steps | 50-100 for quality |
cfg_normalize | True | CFG normalization | Keep enabled for stability |
💡 Pro Tip: Start with 4 layers and 640 resolution for fastest results. Increase layers only if initial decomposition lacks detail.
Advanced: Recursive Decomposition
# Decompose a specific layer further
selected_layer = output_images[1]  # Choose layer to refine

# Run decomposition on the selected layer
refined_inputs = inputs.copy()
refined_inputs["image"] = selected_layer
refined_inputs["layers"] = 3  # Sub-layers

with torch.inference_mode():
    refined_output = pipeline(**refined_inputs)
    sub_layers = refined_output.images[0]

# Now you have hierarchical layers
Comparison with Traditional Methods
Qwen-Image-Layered vs. Photoshop Manual Layering
| Aspect | Photoshop (Manual) | Qwen-Image-Layered |
|---|---|---|
| Time Required | 30-60 minutes | 2-5 minutes |
| Skill Level | Professional | Beginner-friendly |
| Background Reconstruction | Manual painting | Automatic AI inpainting |
| Cost | $54.99/month subscription | Free (open source) |
| Consistency | Varies by artist | Reproducible |
| Batch Processing | Tedious | Scriptable |
Qwen-Image-Layered vs. Segment Anything Model (SAM)
| Feature | SAM | Qwen-Image-Layered |
|---|---|---|
| Output | Binary masks | Complete RGBA layers |
| Transparency | No | Yes (alpha channel) |
| Occlusion Handling | No | Yes (inpaints hidden areas) |
| Editability | Requires additional tools | Immediate |
| Layer Stacking | Manual composition | Automatic |
| Use Case | Segmentation tasks | End-to-end editing |
Qwen-Image-Layered vs. Flux Transparent LoRA
Community discussion revealed a similar project for Flux:
"There was a similar project for Flux using custom VAE and LoRA. Since Flux VAEs are compatible with this model, we only need a LoRA to get transparent images."
— u/8RETRO8, Reddit
Key Difference: Qwen-Image-Layered is a complete solution, while Flux requires additional LoRA training and VAE configuration.
Community Response and Use Cases
Reddit Community Highlights
1. Adobe Disruption Sentiment
"I don't want AI to win, I just want Adobe to lose."
— u/thoughtlow (2.3K upvotes)
This sentiment reflects widespread frustration with Adobe's subscription model and excitement about open-source alternatives.
2. Professional Workflows
Selection and Masking Replacement:
"Would be amazing to scrap Photoshop subscription. I only have it for selection/masking and the time saved is worth the cost."
— u/WitAndWonder
3. Game Development
Sprite Creation:
"This will fix a lot of issues making sprites with diffusion. You always have color behind you need to clip out. Much easier to diffuse sheets with transparency."
— u/ArtfulGenie69
4. Comic Translation and Animation
Workflow Concept:
Step 1: Remove speech bubbles (isolated layer)
Step 2: Animate using separated layers
Step 3: Achieve human art + AI superpowers combo
Step 4: Disrupt big studios
— u/broadwayallday
Real-World Use Case Examples
Example 1: Recoloring Specific Elements

Figure 4: First layer recolored while other content remains unchanged
Application: Product color variants, branding adjustments
Example 2: Object Replacement

Figure 5: Character replaced from girl to boy using layer editing
Application: Model swapping, demographic variations
Example 3: Text Editing

Figure 6: Text revised to "Qwen-Image" on isolated layer
Application: Signage localization, branding updates
Example 4: Clean Object Removal

Figure 7: Unwanted object deleted cleanly with automatic background fill
Application: Photo cleanup, distraction removal
Example 5: Distortion-Free Resizing

Figure 8: Object resized without warping or quality loss
Application: Composition adjustments, emphasis changes
Example 6: Free Object Movement

Figure 9: Objects repositioned freely within canvas
Application: Layout optimization, composition redesign
Frequently Asked Questions
Q: Can I run this on my local machine without a GPU?
A: While technically possible using CPU, it's not recommended due to extremely slow processing times (30+ minutes per image). Minimum 8GB VRAM GPU is advised. Cloud GPU services (Google Colab, RunPod) are affordable alternatives.
Q: What image sizes are supported?
A: The model supports two resolution buckets:
- 640px: Recommended for most use cases (faster, stable)
- 1024px: For high-resolution needs (slower, more VRAM)
Images are automatically resized to fit these buckets while maintaining aspect ratio.
Q: How does this compare to remove.bg for background removal?
A: Remove.bg only removes backgrounds. Qwen-Image-Layered:
- Separates ALL elements into layers (not just foreground/background)
- Reconstructs hidden areas behind objects
- Provides editable layer stacks for further manipulation
Q: Can I control which objects go on which layers?
A: Currently, layer assignment is automatic based on semantic understanding. Manual control is not yet available, but recursive decomposition allows you to refine specific layers.
Q: Is this better than Photoshop's AI selection tools?
A: For automatic layer separation, yes. For fine-tuned manual control, Photoshop still has advantages. Best use case: Qwen-Image-Layered for initial decomposition, then Photoshop for refinement (if needed).
Q: What's the difference between this and inpainting models?
A: Inpainting fills masked regions. Qwen-Image-Layered:
- Automatically identifies what to separate
- Creates complete layers with transparency
- Inpaints hidden regions behind objects
- Outputs ready-to-edit layer stacks
Q: Can I use this commercially?
A: Yes! Apache 2.0 license permits commercial use without restrictions.
Q: Will this work with anime/cartoon images?
A: Yes, the model handles various art styles. Community members specifically mentioned using it for manga/comic editing and sprite generation.
Q: How do I handle images with more than 8 distinct elements?
A: Use recursive decomposition:
- Initial decomposition into 6-8 layers
- Select complex layers
- Decompose those layers further into sub-layers
- Repeat as needed for infinite refinement
Q: What happens to image quality after decomposition?
A: Layers maintain original quality. Since the model uses diffusion-based generation, there may be slight variations in reconstructed hidden areas, but foreground elements preserve detail.
Q: Can I integrate this into my existing Python workflow?
A: Absolutely! The pipeline is built on HuggingFace Diffusers, making it compatible with standard Python image processing workflows. See the implementation guide above for code examples.
Conclusion and Next Steps
Key Insights
Qwen-Image-Layered represents a paradigm shift in image editing:
- Democratizes Professional Tools: Makes layer-based editing accessible without expensive software or expertise
- Automates Tedious Work: Eliminates hours of manual selection and masking
- Enables New Workflows: Recursive decomposition and automatic occlusion handling unlock previously impractical editing approaches
- Open Source Advantage: Apache 2.0 license ensures free access and community innovation
Who Should Use This?
✅ Ideal For:
- E-commerce businesses (product photo variations)
- Graphic designers (rapid prototyping)
- Game developers (sprite generation)
- Content creators (social media assets)
- Photographers (quick subject isolation)
- Comic artists (translation and animation prep)
⚠️ Not Ideal For:
- Ultra-high-resolution professional photography (limited to 1024px)
- Scenarios requiring pixel-perfect manual control
- Real-time applications (processing takes 2-5 minutes)
Immediate Action Steps
- Try the Demo: Visit HuggingFace Space for browser-based testing
- Set Up Locally: Follow the installation guide if you have GPU access
- Join Community: Engage with r/StableDiffusion for tips and workflows
- Experiment with Recursive Decomposition: Test hierarchical layer refinement
- Integrate with Qwen-Image-Edit: Combine layer decomposition with advanced editing
Future Outlook
Based on community discussions and model capabilities:
- Expected Improvements: Better character consistency, higher resolution support
- Potential Integrations: ComfyUI nodes, Photoshop plugins, web services
- Ecosystem Growth: LoRA training for specific use cases (sprites, comics, products)
- Adobe Competition: Increasing pressure on subscription-based editing software
Resources
- Official Blog: qwen.ai/blog
- GitHub Repository: github.com/QwenLM/Qwen-Image-Layered
- HuggingFace Model: huggingface.co/Qwen/Qwen-Image-Layered
- Research Paper: arxiv.org/abs/2512.15603
- ModelScope: modelscope.cn/models/Qwen/Qwen-Image-Layered
🚀 Final Thought: As one Reddit user aptly summarized: "This is the most logical solution to fine editing tasks." Qwen-Image-Layered isn't just another AI tool—it's a fundamental reimagining of how we interact with images.
Citation: If you use Qwen-Image-Layered in research or production, please cite:
@misc{yin2025qwenimagelayered,
      title={Qwen-Image-Layered: Towards Inherent Editability via Layer Decomposition},
      author={Shengming Yin, Zekai Zhang, Zecheng Tang, Kaiyuan Gao, Xiao Xu, Kun Yan, Jiahao Li, Yilei Chen, Yuxiang Chen, Heung-Yeung Shum, Lionel M. Ni, Jingren Zhou, Junyang Lin, Chenfei Wu},
      year={2025},
      eprint={2512.15603},
      archivePrefix={arXiv},
      primaryClass={cs.CV}
}
Last Updated: December 2025 | Article Type: Technical Guide & Analysis